Today we have a really adorable altered baseball rack
to share with you and some really adorable cards to
make for family and friends out of the New Baseball Collection.
We hope you loved all the pages that they did on Monday and
I am sure that you are going to love all the inspiration you
get from the projects with this gorgeous paper today!!
We hope you loved all the pages that they did on Monday and
I am sure that you are going to love all the inspiration you
get from the projects with this gorgeous paper today!!
 |
| Altered Baseball Rack by Liz Chidester |
This is a wooden baseball rack that she altered using this perfect Baseball Collection.
First, she painted the whole rack brown and let it dry
and then she covered it with papers, stickers and chipboard.
Her son was soooo excited to hang his ball,
and then she covered it with papers, stickers and chipboard.
Her son was soooo excited to hang his ball,
bat and favorite glove on it and now thanks to his mom
he has the perfect place to keep everything for when he is ready to play!!
he has the perfect place to keep everything for when he is ready to play!!


Supplies: BB005, BB003, BB012 stickers, BB014 chipboard
purchased rack from a sporting goods store to paint
Emily created this fantastic set of cards to give for
lots of birthdays you may have on your calendar ahead!!
She stamped each of the cards with coordinating inks and
then added embellishments to make each of them unique
and really stand out!! Add our foam pop dots to make it
stand out even more on the cards!


 |
| Baseball Cards by Emily Branch |
lots of birthdays you may have on your calendar ahead!!
She stamped each of the cards with coordinating inks and
then added embellishments to make each of them unique
and really stand out!! Add our foam pop dots to make it
stand out even more on the cards!

“Baseball” Cards
Patterned Paper: (BB002, BB003, BB004, BB005, BB006, BB009,
BB010 from Baseball collection) Best Creation.
Clear Stamps: (Button Boutique set, Ad Sense set) Papertrey Ink
Dye Ink: (Rhubarb Stalk, Cantaloupe, Tea Leaves, Rich Cocoa) Tsukineko.
Chalk Ink: (Creamy Brown) Clearsnap.
Fibers: (Brown striped ribbon). (Green polka dot Trim) BoBonny.
Accents: (Glitter numbers, Glitter baseball player, “Home Run” sticker
from BB012; Baseball collection) Best Creation. (Star pin) Maya Road.
(Vintage tinted tape) Vintage Street Market.
Tools: (Border punch) Martha Stewart. (Tiny tags set, Ad Sense set) Papertrey Ink.
Other: (Coaster Board) Papertrey Ink.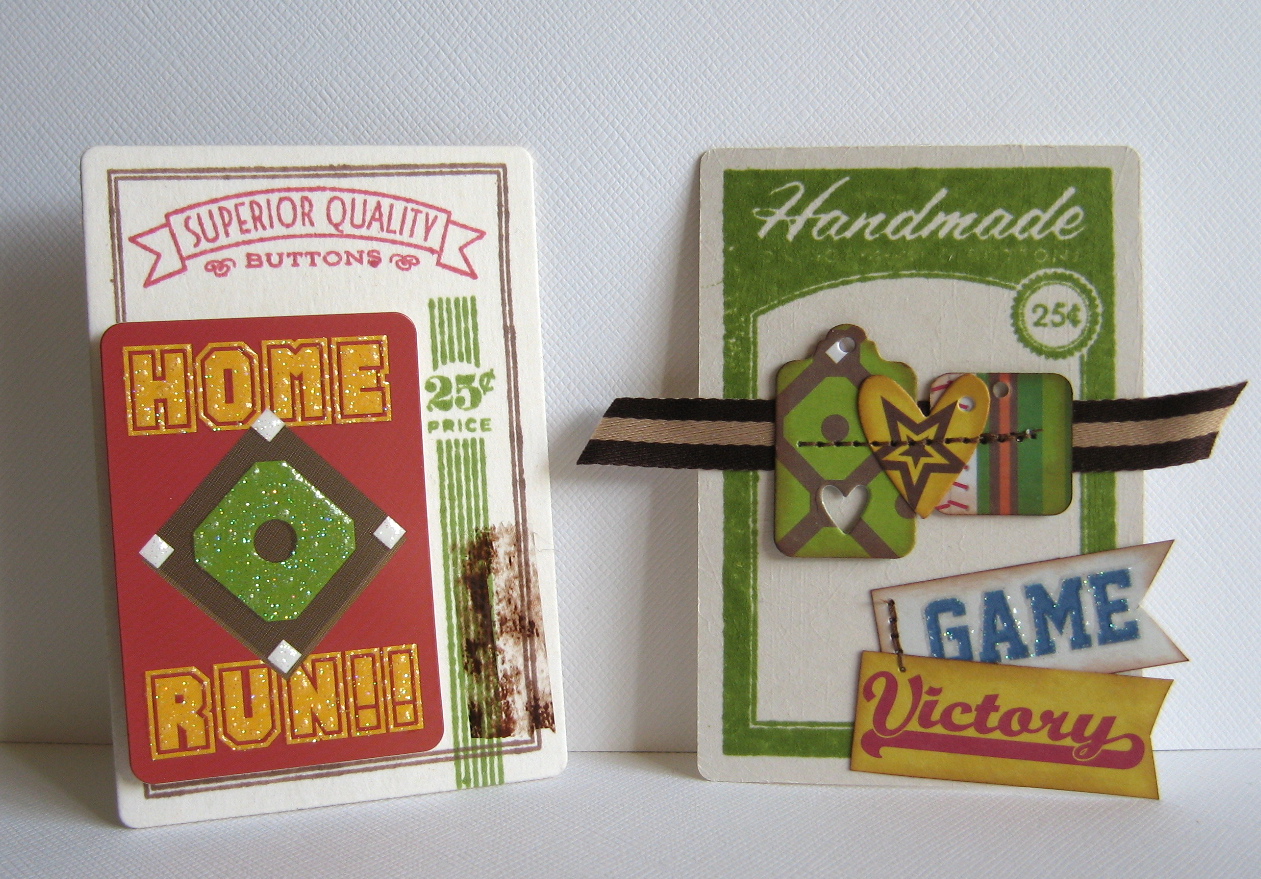
 |
| Baseball shoe card by Sandy Ang |
Sandy is nothing short of amazing and came up with
this little baseball shoe card to give to someone! Sooo cute!
We also thought it would be a great cover to put over
a mini book that has photos of your child and their
team and lots of great journaling to remember the season!
Others : Black cord, white grommets
 |
| 7th Birthday card by Alicia Barry |
Alicia layered lots of the little numbers and stars from the stickers
on to a white card and a piece of the die cut. She made the word birthday
from the mini letters and added some dotted ribbon at the top. It came out
really cute and a great card to give for a Birthday!!!
Materials: Baseball 6x6 paper pad, BB001, BB008, IA013 (letter stickers),
on to a white card and a piece of the die cut. She made the word birthday
from the mini letters and added some dotted ribbon at the top. It came out
really cute and a great card to give for a Birthday!!!
Materials: Baseball 6x6 paper pad, BB001, BB008, IA013 (letter stickers),
ribbon, dimensional paint I used the back of one of the die cut papers
from the paper pack as it has a more general theme to it.
 |
| Baseball Ticket Gift card by Debbie Sherman |
Debbie created this adorable little card with lots of fun
baseball embellishments and a cute tie with some baseball
ribbon on the side. You even have a place on the inside to
give a few tickets for a game and a special wish for
a very Special Day!!

supplies:
BB008, BB013,BB001-6x6 paper pad - die cut
Additional items, Brads, Ribbon, corrugated letters
 |
| Happy Father's Day by Jona Panessa |
This adorable card would be great to give to any dad for
fathers day and has the perfect theme to use with baseballs!!
Supplies: Baseball 6x6 pad BB016
fathers day and has the perfect theme to use with baseballs!!
Supplies: Baseball 6x6 pad BB016
Bazill cardstock
Alpha - from I love America line
 |
| Cheers by Jona Panessa |
Jona created this really cute card using a Whipper Snapper stamp that
she colored with Copic markers for the front and used lots of layering with
the pieces from the 6x6 pad of papers and the die-cut and ribbon.
supplies: Baseball 6x6 pad BB016
she colored with Copic markers for the front and used lots of layering with
the pieces from the 6x6 pad of papers and the die-cut and ribbon.
supplies: Baseball 6x6 pad BB016
Whipper Snapper stamp
Alpha - BB013, copic ciao pens to color
and miscellaneous ribbons
Have a great Day Everyone!!
Have a great Day Everyone!!
These are great samples of the paper.... Way to go girls
ReplyDeleteWith five grandson this is a definetly on my list of wants.
ReplyDeleteThat is such a cute decoration Everything is a Homerun.
Great work by your designers.!
Fabulous projects girls ♥
ReplyDelete