So if you haven't been on our Flower Blog hop be sure and start
from the link here. Our hop ends on Thurs nite at 12 PST so hop on over and
get some inspiration from our team to make lots of quick and
gorgeous hand made flowers for your cards and layouts.
get some inspiration from our team to make lots of quick and
gorgeous hand made flowers for your cards and layouts.
We have so many great things that we want to share
with you all from our New Travel line we just can't wait another day
to show you...so here goes!
to show you...so here goes!
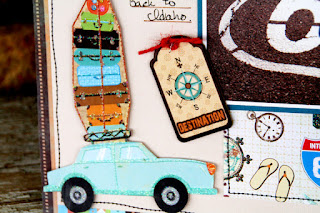
No matter where you go on the globe our new papers are going to be
just perfect for creating pages, cards, travel journals, luggage tags and
just about anything you may need to do. The gorgeous shades of blues,
browns and peach blend perfectly with photos from all parts of our planet.
browns and peach blend perfectly with photos from all parts of our planet.
You are going to love everything our team created today for you
and we have so many ideas to share with you
that we are going to post more again tomorrow
and we have so many ideas to share with you
that we are going to post more again tomorrow
so don't forget to bookmark it or become a follower
and check back again with us!!
Our designer Debbie Sherman created this layout to remember
a beautiful place on a mountain in Wyoming in the springtime.
She used one of our diecuts, our coffee glitter dot paper, flowers
and some of our new stickers and chipboard pieces.
and check back again with us!!
Our designer Debbie Sherman created this layout to remember
a beautiful place on a mountain in Wyoming in the springtime.
She used one of our diecuts, our coffee glitter dot paper, flowers
and some of our new stickers and chipboard pieces.
Our designer Julie Walton created this fun layout with lots of
photos from a trip she made to Chicago. This is a great idea to
get lots of photos on a page and then add cute tags and stickers
for journaling the who, what, where and whens of the trip!
Our designer Tina Mc Donald made this page because she
doesn't have much opportunity to travel but would still love to go someday!
She used the diecut in a different way by cutting the top and bottom off
and joining them together in the middle of the page. She used a
cardstock sticker border to hide the seam and added handmade flowers
and lots of stickers and chipboards pieces and journaling.
Our designer Jona Saavedra lives by these gorgeous beaches
in the Philippians and this cute layout of her family laying
in that crystal blue water is just adorable!
Our designer Nancy Burke made this beautiful layered
card with lots of punches, sewing, ribbons, burlap, a doilie
and the sticker sheet with our new mini alphabets.
Our designer Debbie Sherman created
this fun card with the travel words paper and used
a edge punch to create the band across the middle and
added a piece of lace, some flowers and buttons.
The machine stitching around the outside adds the
perfect border to finish this super cute card off to send to a friend.
Our designer Nancy Burke made this patchwork layout by cutting
smaller pieces of our different papers and creating the backround.
Then she added lots of photos along Route 66 and finished it
with stickers and some machine stitching all around to keep everything secure!
Nancy also created this super cute
card to look like a piece of luggage and even made
the straps with brads and metal fasteners. Popping up
the tags with foam dots will always make your cards
and projects look awesome by adding more dimension.
Our designer Alicia Barry created this page and in gorgeous
shades of blue and peach and added some of her signature
handmade flowers and doiles on each side of the layout.
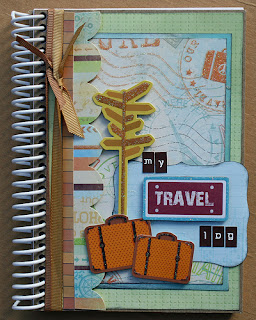
Our designer Kim Holmes created this must have
travel journal for any trip using a purchased book
and adding papers and stickers to decorate the front.
and making your own luggage tags will make it that much
easier to find your luggage when the sea of black
comes rolling around the baggage area on your next trip :)
Our designer Alicia also created this really fun 3 D page
to remember a trip to London. This page can fold down to put in a
book or put on a table or mantle to remember what a great trip you had.
We hope the inspiration is oozing out of you by now
and be sure and ask your LSS to get the Travel line if they
haven't already or shop online at one of our favorite stores!
Don't forget to check out our Flower Hop
and see you back tomorrow!


My LSS does carry the travel line and it is super detailed and cute in person. I wanted to say thanks again for the flower hop. I found it very informative and it was the first hop that I felt was directed at the viewers and not the product.
ReplyDeleteThese are all soooooo fantastic!!! I'm so glad that I have this line on its way very soon!! :)
ReplyDeleteMichelle - That is such a wonderful compliment! Thank you for hopping with us!! :)
Super work - all these pieces are just fab.
ReplyDeleteToni :o)
Seeing the DT projects all together really brings out how versatile and creative this collection is.
ReplyDeleteLOVE THIS!!! I have been playing with it all week and love what the DT came up with so far!
ReplyDeleteI really love this line it's the most fav for me from CHA.... can you list the stores that will carry it.?
ReplyDeleteOh this would be fun for all my pictures last couple of trips.. Fun Fun Fun
ReplyDeleteThanks for the inspiration
I love this line, all the projects are gorgeous. TFS Kx
ReplyDeleteWhat wonderful projects! I love the colors of this line.
ReplyDeleteWOW these are UH MAY ZING! I love them all!!
ReplyDeleteWOW ladies!You did it BIG time!
ReplyDelete´What a collection of beautiful creations - love the color scheme of the travel line
ReplyDeleteThis comment has been removed by the author.
ReplyDeletegreat inspiration from the DT!
ReplyDeleteYou've done an outstanding job with picking Members to reprsent you. I travel with my cousin on small weekend trips this paper is just Beyond beautiful.
ReplyDeleteThanks for the flower hop... I learned a couple news thing but I love making flowers... so this was a real treat.
Great travel pages
this is my favorite line!
ReplyDeleteThis comment has been removed by the author.
ReplyDeleteWhat do you call the strings you used for the luggage tags?
ReplyDeleteWhat do you call the strings you used for the luggage tags?
ReplyDeleteWhat do you call the strings you used for the luggage tags?
ReplyDelete