
Gift Tray - Decor with Heat Transfer Glitter

Our Glitter Iron On can be applied to many surfaces besides fabrics. It even works great with regular cardstock paper! Today, we created a beautiful home decor piece using these two items. Here's how we did it:


Materials
Best Creation Glitter Iron-on GIO009
Any design cardstock
Tray

Tools
Ruler
Paper or Wood Glue
Rotary Trimmer 17”
Cutting Machine
Scissors
Iron
Thin fabric

Step 1.  You can buy a tray that is already painted. Cut the design cardstock you will put on the base of the tray to the size of the tray, so that the whole base will be covered.


Step 2   Using a flat brush of soft bristle, apply glue for paper or wood to the area where you will put the paper.

Step 3  Before the glue dries, adhere the paper to the base of the tray. You must apply a little pressure so that the paper is well glued.

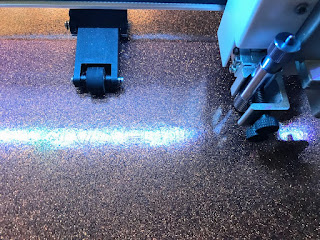
Step 4  Cut a design on the Glitter Iron On GIO009. You can use an electric or manual die-cutting machine, as well as punches or just scissors. If using a machine, remember to use the mirror function in the design program, and cut the vinyl with the opaque side up


Step 5  Remove (weed) the extra Glitter Iron On material, leaving only your desired image on the plastic layer.

Step 6    (Refer to photo) Place your image on top of the cardstock paper on the base of the tray. The plastic layer must be facing up, and adhesive (sticky) part should be faced down. Make sure you place a separate piece of thin material on top before applying heat.
Step 7  Set your iron on medium-high, no steam. Apply firm pressure with iron for 30-60 seconds.

Step 8  Remove the plastic layer. Peel hot. If you want, place the separate material or protective cover over image and iron on for an additional 5 seconds to ensure all parts adhered well.

Step 8  You can add resin after finishing the design to protect the cardstock and design from getting damaged or dirty.
You can change up the designs and tray color to fit any occasion. We have 21 colors of the Glitter Iron On to choose from! You can purchase these directly from us through our website www.bestcreationinc.com, or find a store near you that carries them. If you are a wholesaler, visit our wholesale website www.bestcreation.us
If you would like to use the same designs as us, let us know and we can send you the SVG files that you can use with your electric cutting machines.  

We invite you to comment on what kind of designs (with instructions) you would like to see!

Comments

Popular posts from this blog

DIY TUTORIAL: Unicorn Headband

UNICORN  HEADBAND   Materials Best Creation Basic Glitter  Card Stock GCS065, GCS066,GCS067, GCS 048 Cardstock  white and with design Ribbon Tools Ruler Die Cut Round Glue Rotary Trimmer Step 1.   You can buy  a headband  and  cut  the Basic Glitter Card Stock GCS010   using the SVG file. You can cut using a cutting machine or with scissors.                                                                                                         Step 2   Cut the pink ribbon and make the bow.  Hold after until the glue is dry.   Step 3   Apply glue for the glitter paper and hold with the fabric until the glue is dry Step 4  Apply glue to the bow  and hold with a clothes pin to  the headband                                     You can decorate this project depending on the party theme. It can be used for birthday parties, baby showers, weddings, holidays and much more. It is important to use the Best Creation Basic Glitter cards

DIY: Under the Sea Invitation

DIY: Under the Sea Invitation Summer themed birthday parties and gatherings are always a fun way to bring friends and families together.  Get your guests rounded up with these cute Under the Sea themed invitations.  In this DIY Tutorial we use our glitter cardstock and glitter iron-on vinyl. Make sure to post your project with the hashtag #bestcreationDIY for a chance to be featured on our social media! Happy crafting! You can purchase materials for this project on our Etsy page here .    Materials Best Creation Basic Glitter  Card Stock GCS008. Glitter Iron  GIO12 (Ocean Blue) Cardstock  white and purple Purple Brad Tools Ruler Glue Iron Scissors, cutting machine, or dies Step 1 Cut  the Basic Glitter Card Stock GCS008 (Ocean Blue) using the SVG file. You can cut using a cutting machine or with scissors.  After cut 2 pieces of the regular purple cardstock. Cut the purple cardstock pieces slightly bigger than the SVG file. Step 2

It's our Mini Book Blog Hop Today......

How would you like to learn how to create a fun Mini Book  out of one 12x12 and be inspired to make 20 different versions of it?  Well get ready to hop- because today on each of our blogs we  will share with you some fun and creative different versions on how  to make  this simple mini book we did at the CHA Winter Show.  Here is the book and photos of the basic cuts to get you started  First cut your paper into thirds then fold each third in half and glue the pieces together to make 3 pages and now off you go  to our first designer on the hop Alicia Barry   to inspire you with more ideas and ways to embellish it and change it up for lots of different occasions. And... if you need some Amazing Adhesives to put it all  together be sure and grab some Helmar 450, some  Scrapdots  to pop it up and give it dimension  and  Helmar Craft glue too.   They work fantastic on our papers and all  of our designers love using it! Here is the links and order list just in case one is br