
DIY TUTORIAL: SUPER MOM CAP
 

Materials

Best Creation Heat Transfer Vinyl  Iron-on HTV12,HTV02 and HTV11
Backpack


Tools

Cutting Machine or dies
Scissors
Iron

Buy the vinyl HERE.


Step 1.  


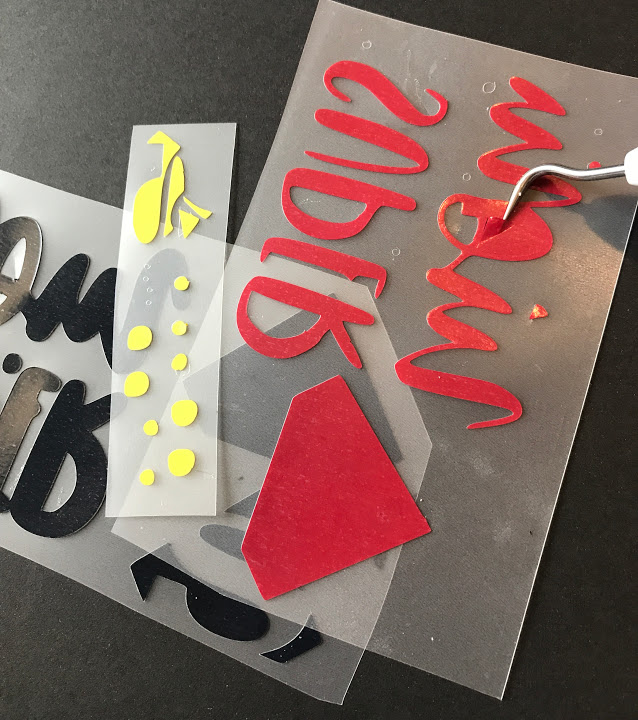
You can buy a cap of any color, and  cut a design on the Heat Transfer Vinyl  Iron-on HTV12,HTV02 and HTV11, using your cutting machine or dies.  All products are from Best Creation Inc.  Remember to use the mirror function in the design program, and cut the vinyl with the opaque side up. For designs with different layers, you must cut with intersection vinyls to try as much as possible not to overlap and make your design features more precise. Remove (weed) the extra glitter iron on, leaving only your desired image.
     

Step 2 


(Refer to the photo) Place your image on the material with plastic facing up (Refer to the photo). Make sure you place a separate piece of thin material on top before applying heat and set your iron on medium high, no steam.


Step 3  


Apply firm pressure with iron for 30 seconds. You need to begin with the back layer.  Remove the plastic. Peel while cold. If you want, place the separate material or protective cover over image and iron on for an additional 5 seconds. And finish with the last level.


You can decorate this project for a school. It can be used for parties, games, gifts, and much more. It is important to use the Best Creation Glitter Iron because they are high quality vinyl.                                                                                                                                                                          
We invite you to comment on what kind of designs (with instructions) you would like to see!
Use the store locator to find the closets retail store near you!!These are some ideas for your design!
                                   

Comments

Popular posts from this blog

DIY TUTORIAL: Unicorn Headband

UNICORN  HEADBAND   Materials Best Creation Basic Glitter  Card Stock GCS065, GCS066,GCS067, GCS 048 Cardstock  white and with design Ribbon Tools Ruler Die Cut Round Glue Rotary Trimmer Step 1.   You can buy  a headband  and  cut  the Basic Glitter Card Stock GCS010   using the SVG file. You can cut using a cutting machine or with scissors.                                                                                                         Step 2   Cut the pink ribbon and make the bow.  Hold after until the glue is dry.   Step 3   Apply glue for the glitter paper and hold with the fabric until the glue is dry Step 4  Apply glue to the bow  and hold with a clothes pin to  the headband                                     You can decorate this project depending on the party theme. It can be used for birthday parties, baby showers, weddings, holidays and much more. It is important to use the Best Creation Basic Glitter cards

DIY: Under the Sea Invitation

DIY: Under the Sea Invitation Summer themed birthday parties and gatherings are always a fun way to bring friends and families together.  Get your guests rounded up with these cute Under the Sea themed invitations.  In this DIY Tutorial we use our glitter cardstock and glitter iron-on vinyl. Make sure to post your project with the hashtag #bestcreationDIY for a chance to be featured on our social media! Happy crafting! You can purchase materials for this project on our Etsy page here .    Materials Best Creation Basic Glitter  Card Stock GCS008. Glitter Iron  GIO12 (Ocean Blue) Cardstock  white and purple Purple Brad Tools Ruler Glue Iron Scissors, cutting machine, or dies Step 1 Cut  the Basic Glitter Card Stock GCS008 (Ocean Blue) using the SVG file. You can cut using a cutting machine or with scissors.  After cut 2 pieces of the regular purple cardstock. Cut the purple cardstock pieces slightly bigger than the SVG file. Step 2

It's our Mini Book Blog Hop Today......

How would you like to learn how to create a fun Mini Book  out of one 12x12 and be inspired to make 20 different versions of it?  Well get ready to hop- because today on each of our blogs we  will share with you some fun and creative different versions on how  to make  this simple mini book we did at the CHA Winter Show.  Here is the book and photos of the basic cuts to get you started  First cut your paper into thirds then fold each third in half and glue the pieces together to make 3 pages and now off you go  to our first designer on the hop Alicia Barry   to inspire you with more ideas and ways to embellish it and change it up for lots of different occasions. And... if you need some Amazing Adhesives to put it all  together be sure and grab some Helmar 450, some  Scrapdots  to pop it up and give it dimension  and  Helmar Craft glue too.   They work fantastic on our papers and all  of our designers love using it! Here is the links and order list just in case one is br