There is nothing more beautiful or more magical then
a tree with its wonderful glorious smell
decorated to the hilt and filled with glittery shiny lights
at Christmas time!
If you start to look around on the web
there is so much history that you can find behind the trees that
we keep as a tradition today. Some records say that the first
decorated trees in houses came from Germany in 1605 from
a small farm in Strasburg Germany where a family put a small
tree in their home and decorated it with
paper roses, apples and candies.
Queen Elizabeth loved the idea and took it to England
and started the tradition there too.
Decorating those beautiful pine trees has evolved
through time by adding candles to
celebrate the birth of Christ and we added beautiful
handblown glass ornaments and those made
out of paper and garlands made of popcorn.
And we even trimmed the trees with tinsel
that was invented in Germany in 1610 and was real silver!
But it tarnished really bad from the candles so it
eventually ended up as the plastic silver we use today.
Could you just imagine those trees and how
beautiful they looked ?
So today our DT came up with some ideas to decorate
your pages and your homes with these festive trees
and we hope we inspire you
to create something fun this holiday too!

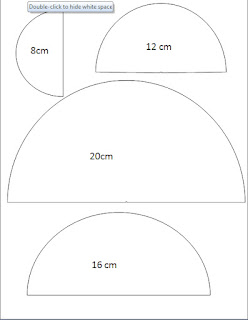
designer: Karen Thind
These fun trees are actually for placecards for your
Christmas table! They are made with little cones
that vary in size and you can stack them and
interchange them to create all kinds of cute
little trees for even the kids to play with. Our
gorgeous glittery papers leave little work for you
to make them extra sparkly and fun!!

Karen even gave us a pattern for
this super cute and fun project.


designer: Jona Panessa
Jona said this was the perfect page to tell of
all the excitement the boys had on Christmas
morning opening their gifts. We love all the tiny
details of the lace and ornaments on the page
and of course the tiny little presents by the tree!


designer: Kim Holmes

designer: Karen Thind
This Christmas tree is the one at Disneyland
and Karen took a great picture to show that
not all trees can fit in the house :)

designer: Teresa Horner
It is really fun to take photos of a decorated
tree at night with all the lights off except the ones
on the tree. There is so much glitter on this my
camera had a tough time of focusing but
the actual tree picture came out really fun with
all the colors of lights and decorations!

if you find a cute tag that you like you
can rub on a little Tim Holtz inks to make it
match more with your project.

designer: Debbie Fitzgerald
Opening Gifts on Christmas morning is one
Tradition held all over the world for most of us!
The colors in the paper make the picture pop and
adding the extra rhinestones on the tree
look like little ornaments that glisten and shine!


designer: Jona Panessa
It is fun to take pieces of different papers
and create something that you can decorate your
home with too. Jona made this cute doorhanger
to welcome all of those who come to her home
for the Christmas Holiday!

designer: Jona Panessa
We hope that you enjoyed our fun projects
and don't forget to stop back for some more fun
things to make for friends and family gifts soon!
Have a wonderful and creative day!!
Such great projects!! Love them all! The trees are so cute!
ReplyDeletebeautiful work from design team If I ever should be so lucky
ReplyDeleteBeautiful!!! I really love those trees...really cute!
ReplyDeleteAwesome projects everyone! It sure puts me in the Christmas mood!
ReplyDeletethe trees are so cute when together!
ReplyDeleteVery beautiful projects from the DT team!!
ReplyDeleteLove them all!
Thanks for the inspiration!!
Fantastic work from the DT...thanks so much for the tree templates! Those trees are so cute! :)
ReplyDelete